
How to: using Docker Toolbox as Visual Studio Code CLI
For the last 4 months, I have used Docker in my application development setup for everything but .NET projects. Though I would not call the transition smooth and seamless, I now have all my required services running as Docker containers.
One of the advantages of doing so it that one can manage server dependencies in parallel with code dependencies within a project. You can, therefore, ensure your app bundles a Docker image that contains what it needs to run correctly from a server standpoint.
On a local development environment, I like using Docker because it keeps my host PC free of software I don’t necessarily want running all the time. Because of Docker I no longer need to install HTTP server(s), programming language(s), and database(s) on my host computer. I can easily switch technologies, or versions of a technology or service by requesting another Docker image.
I find this pattern more elegant than installing multiple versions of PHP side by side, than playing with port configurations because IIS and Apache both fight for port 80 or than having a full-fledged virtual machine for each possibility.
Docker Toolbox, the poor man’s version
You cannot install Docker on Windows unless you own Windows 10 Professional or Enterprise 64-bit, both of which ship with Hyper-V enabled.
Other folks like us poor souls must use Docker Toolbox as an alternative. It goes around the Hyper-V problem by running Docker within a virtual Linux machine. It is on this machine’s IP that you will connect instead of the usual localhost. This may seem a convoluted setup, but it makes a lot of sense in practice.
One CLI to run it all
Docker Toolbox ships with its own CLI executable. It is explicitly configured with the correct environment variables and is kicked off with a boot script in order to pre-configure it so that when you type commands such as docker and docker-compose the CLI knows what you are referencing to.
Unfortunately, these settings do not apply to Powershell or any other CLI you may have installed on your computer. Visual Studio Code’s integrated CLI being an instance of Powershell, you cannot use Docker commands within the integrated terminal.
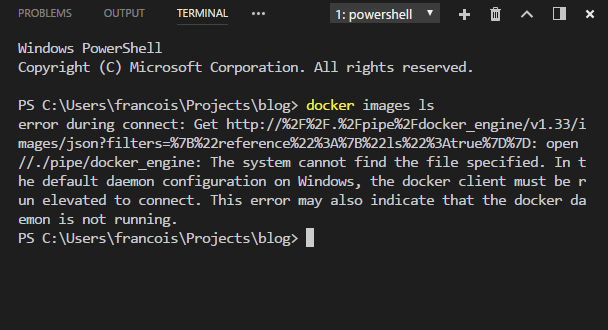 You cannot use Docker commands in Powershell
Let’s see how we can improve the integration of Toolbox within Visual Studio Code.
Configuring Visual Studio Code
VS Code is quite flexible and it allows you to switch the type of integrated terminal it uses. We will replace the default Powershell with the CLI bundled with Docker Toolbox.
Open your user settings by going through the menu or by pressing ctrl + ,. Assuming Docker Toolbox is installed at its default location, add the following settings to the file :
{
    "terminal.integrated.shell.windows": "C:\\Program Files\\Git\\bin\\bash.exe",
    "terminal.integrated.cwd": "C:\\Program Files\\Docker Toolbox",
    "terminal.integrated.shellArgs.windows": ["--login", "-i", "C:\\Program Files\\Docker Toolbox\\start.sh"]
}
What this does is it sets the default terminal to the one shipped with Git, changes the starting directory to Toolbox’s, and it executes the bootstrap script that is usually automatically called by opening the Docker Quickstart Terminal shortcut.
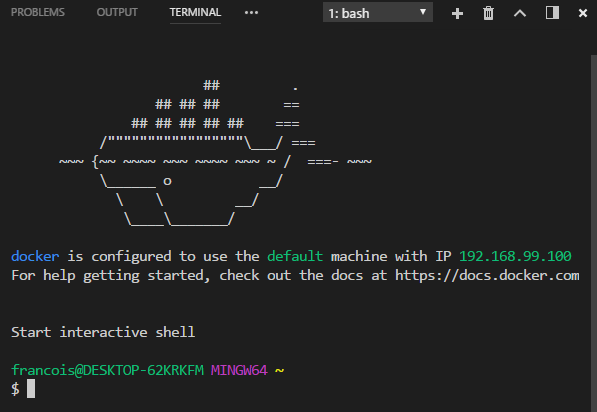 Docker Toolbox is correctly launched
Not quite a celebration
There is one major flaw in this setup that I have not been able to resolve at the moment: take note the directory you end up being loaded in. Instead of booting in the context of the current project’s root directory, you will start your session in your home directory each time.
In theory, one may expect it would be possible to script the whole kickoff process in a custom shell script that eventually sets the current working directory after invoking Toolbox’s start.sh, but that’s just a theory for the moment.
If you happen to improve on this process, drop me a line!